In this Moodle Monday post we will be going back to basics and recapping some of the essential tools for Moodle.
The Text Editor
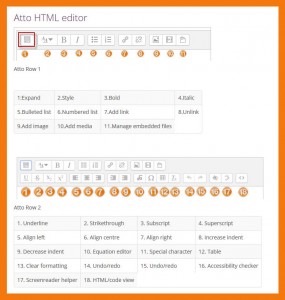
The text editor (sometimes referred to as the ‘HTML editor’) has many icons to assist you in entering content into Moodle. The default text editor in Moodle is the Atto editor, built specifically for Moodle. Whilst some of the features may be familiar to you from your word processing program writing for the web on the web is different, and especially with accessibility and design considerations Atto sometimes you may not do what you expect with a normal editor.

We would advise against copying and pasting directly from Microsoft Word, when you do this it adds in a lot of HTML code to Moodle – some of which can cause Moodle to display things incorrectly. If you have text that you would like to copy across we suggest you copy it into a simple text editor, such as notepad, first. This will remove any formatting which causes the unnecessary code. You can then copy this plain text into Moodle and edit and format it using the Atto editor.
Accessibility in Moodle
One of the tools available in the text editor is an automated accessibility checker which checks for some common errors in the text. These are usually things in the way the text is constructed that can prevent all users from having equal access to information and functionality. The list of problems that the accessibility checker looks for is:
- Images with missing or empty alt text (unless they have the presentation role)
- Contrast of font colour and background colour meets WCAG AA guidelines
- Long blocks of text are sufficiently broken up into headings
- All tables require captions
- Tables should not contain merged cells as they are difficult to navigate with screen readers
- All tables should contain row or column headers
Screen Reader Helper
Screen readers basically treat a content editable region like a text box – which is wrong, because it can contain images, links and more.
The screen reader helper provides additional information about the currently selected text (e.g. is it bold), as well as a listing of any images or links in the text.
Labels
A label acts as a spacer on a Moodle course page. It can be used to add text,images, multimedia or code in between other resources in the different sections. It is a very versatile resource and can help to improve the appearance of a course. Banners or descriptions may be added to labels to distinguish between and highlight different areas. On the other hand, over-use of multimedia (sound,video) in labels can slow down the loading of a course page.
To add a label with the editing turned on choose Label from the “Add an activity or resource” link. From here you can add and edit text, add images and audio/video.
Further Resources
Activities on Moodle
Resources on Moodle
Blocks on Moodle
Course Set Up & Admin
- Moodle 3.0 What’s New
- Creating Moodle courses
- Online Moodle help
- Reports
- Enrolling users
- Accessibility
Which features do you find most useful in Moodle? Are there any areas of Moodle that you’d like to see us cover in our Moodle Monday post? Let us know in the comments.
Emma

0 responses on "Moodle Monday: The Basics - Text Editor, Accessibility and Labels"