

 YSJU provides a number of applications which enable academics to create multimedia content, quizzes and other online activities to help fulfil a range of teaching, learning and assessment objectives. First, it is important to understand how you would like to represent your content, then choose the most appropriate tool to help you create and present it.
Visit ‘Return to Campus: Learning & Teaching’ at https://wp.me/Pa0V3t-3jG for more information!
Day four of our 5 days of Video Creation series is all about interactive videos!
About Interactive Videos
Interactive video allows for a number of learning activities and features to be built around video-based content. To begin the process, it is necessary to have video content available. So to develop interactive video, you must already have specific video content to hand, or in mind.
Content which can be added to an interactive video can include:
- Giving students additional content, such as text pop-ups, images, drawings, etc.
- Giving students open-ended questions during a video where they can provide an opinion
- Giving students additional resources in the form of links, so that they can access additional information about a video
- Giving students discussion opportunities where it is possible to access forums to hold a conversation on the content of the video (these can be guided or open)
- Giving students a quiz where students must answer a series of MCQs, or which can be used to facilitate a voting system, where students can express an opinion in a poll
- Giving students a summary of the content of the video
It is best to use interactive videos as a means of ‘adding value’ to a pre-existing video or making it more interactive. Interactive videos for example, have advantages over simply giving students a link to a video online as they encourage learner participation through questions, discussions and interactions with the video itself.
There are two ways to create interactive videos – H5P Interactive Video activity in Moodle, or adding a survey, poll, or quiz to a Microsoft Stream video.
Today we’re going to focus on adding a survey, poll, or quiz to a Microsoft Stream video, but if you want to find out more about H5P then visit https://tel.yorksj.ac.uk/h5p/
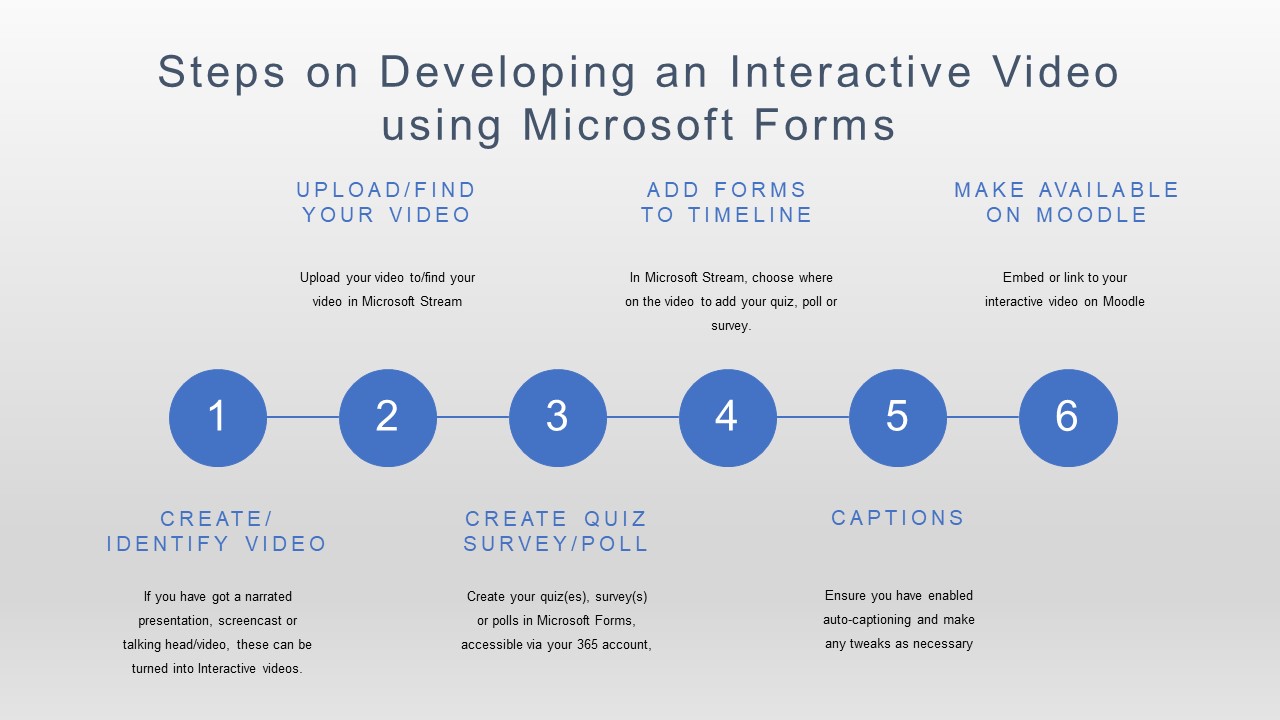
Steps For Creating Interactive Video Using Microsoft Forms
See our getting started with creating Quizzes in MS Forms screencast or follow the steps below
Add a survey, poll, or quiz to a Microsoft Stream video
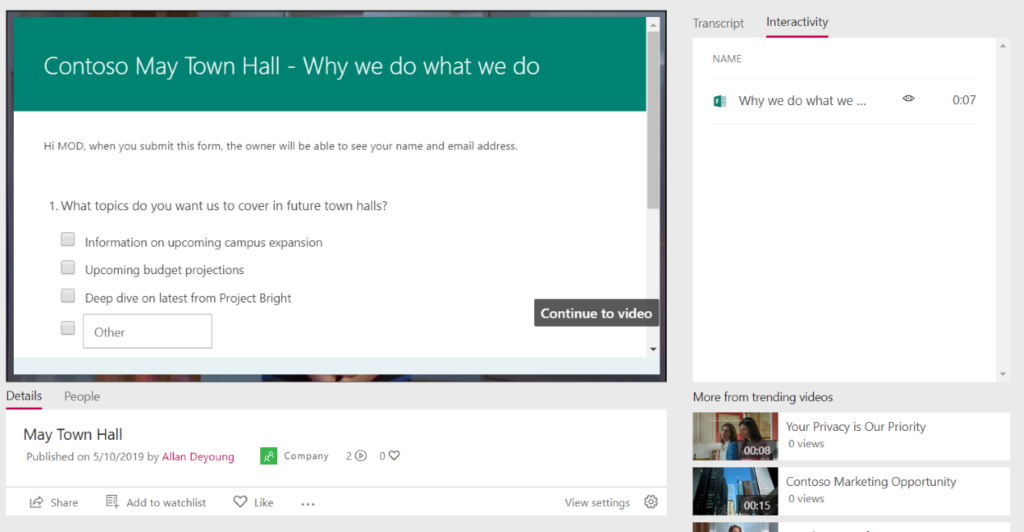
Make your video more engaging by adding a survey, quiz, or poll using Microsoft Forms. You can add forms anywhere in videos you own, view responses, and share a summary link that shows answers and scores in Microsoft Forms.
Add a form to a video
- In Stream, on the My Content menu, click Videos, and select the video.
- On the Interactivity tab, click +Add New.

- To create the form in Forms, click the tool tip next to Form URL, and then click Go to Microsoft Forms.

The form opens in a new browser tab. - In the new browser tab displaying Forms. create a new form:
- If this is the first time you’re using Microsoft Forms, click Get Started, sign in, and then click Create a new form.
- If you have used Forms before, select New Form or New Quiz.
- Create your form by giving it a title, adding questions, selecting a theme, and selecting settings such as customizing a thank you message and getting an email notification for responses.For help creating a form, see Create a new form, Create a new quiz, and Format a form.

- When you’re done creating your form (the form saves automatically), click Share, and then click Copy to copy the URL of the form.
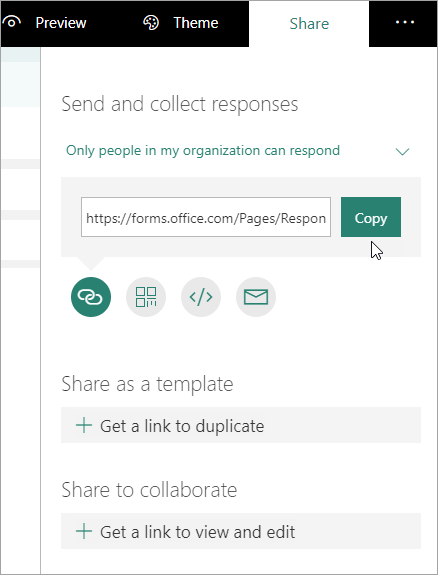
- Return to the browser tab with your Stream video, and paste the URL you just copied into the Form URL text box.

- Name your form. You can use a different name in Stream than you do in Forms.
- Verify that you have the form in the right place in the video. You adjust this by dragging the play head to the new location.

- Click Add to timeline.The Interactivity tab shows the new form.

Review and share form responses
- In Forms, click Forms at the top of the page to go to the Forms home page.
- On the My forms tab, select the form.
- Click the Responses tab.
For more information about viewing responses, see Check your form results or Check your quiz results. - To publish summary information:
- Click the More icon
 under the response summary, and then click Create a summary link.
 - To get the URL, click Copy.
- Share this link with people who need to see the results.
- Click the More icon
Change the title or location of a form in a video
After you have finished creating a form in Stream, you can’t change its title or place on the timeline. If you need to change these, delete the form in Stream, and then create a new form in Stream that points to your existing form in Forms.
- Click the Interactivity tab for the video. You’ll see a list of all the forms and their locations on the timeline.

- To delete the form in Stream, click the arrow next to the time to go to the form, click Delete form, and then in the confirmation dialog box, click Delete.

- Follow the steps in Add a form to a video, using your existing form in Microsoft Forms.
Change the form questions or settings in Forms
You can return to your form in Microsoft Forms to make changes to it. In addition to changing the content, you can also adjust settings such as adding a start or expiration date. For more information about settings, see Adjust your form or quiz settings.
Have you created interactive videos with H5P or Microsoft Stream? Did you add interactivity to your own video, or as a way to ‘add value’ to another video? If you have any questions, comments or advice for others, then please let us know in the online learning and teaching support Teams space
Phil
0 responses on "5 Days of Video Creation: Interactive Video"