
Welcome to day one of 5 Days of Video Creation.
YSJU provides a number of applications which enable academics to create multimedia content, quizzes and other online activities to help fulfill a range of teaching, learning and assessment objectives. First, it is important to understand how you would like to represent your content, then choose the most appropriate tool to help you create and present it.
Visit ‘Return to Campus: Learning & Teaching’ at https://wp.me/Pa0V3t-3jG for more information.
Today we shall be discussing narrated presentations. Many of us have started to create narrated presentations to record lectures and we have a number of tools you can use.
For the purpose of this first post, I will be talking about using PowerPoint to create narrated presentations, but there are other tools available to YSJ staff such as Microsoft Stream, Screencast-o-matic and MEDIALecture and we will be covering these tools in the days to come.
About Narrated Presentations
Narrated presentations are presentations with a voice over recording. For example, voice recordings over PowerPoint slides. The narrated presentation can then be published as a video. This type of video creation has risen in popularity and PowerPoint is one of the tools we would recommend.
Narrated presentations could be used to create:
- online lectures
- module assessment information (This can reduce the number of queries you may receive)
- short presentations on Key concepts
Advantages
- Narrated presentations replicate a common lecture and classroom environment, which is familiar to students.
- Students will have the ability to stop, rewind and watch the narrated presentations over and over again.
- Creating narrated presentations means you can use PowerPoint slides you have already developed and created and is a tool you are familiar with.
Disadvantages
- What you don’t get with narrated presentations is the interactivity with your audience when you give lectures. See how you can create some interactivity with your narrated presentations using Microsoft Forms on day four of the 5 days of Video Creation series.
- You don’t see the faces of your students, which might cue whether or not they have understood the material.
- Recording PowerPoint slides on a Chromebook does not work.
Things to consider when creating your narrated presentation in PowerPoint
Will you publish it directly to Microsoft Stream from PowerPoint or will you export your presentation as a video and upload it to our Media Library? Uploading your video to these platforms as a video will allow you to share a link or copy the embed code so you can embed your video onto Moodle. If you don’t want to create a video from the narrated presentation and you just want to embed the presentation, it is possible to do this, but the process is slightly different, so please get in touch with us if this is something you are considering.
Publishing or uploading videos directly to Microsoft Stream from PowerPoint will allow you to create auto-captions for your video. These often have to be edited afterwards as the accuracy is not always 100% and may need a little tweaking. If you do not publish your video to Stream, you could create your own captions using tools such as Notepad. From my perspective, I have found exporting directly to Microsoft Stream and making those edits appears to be the most streamlined and efficient way of creating captions for narrated presentations.
Process for developing a Narrated Presentation Screencast using PowerPoint
The process of creating and publishing narrated presentations using PowerPoint is relatively simple.
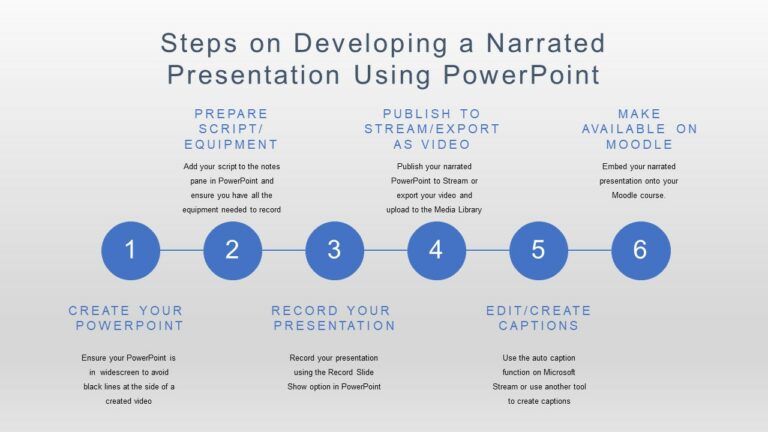
Step 1 – Create your PowerPoint. Make sure you do it in widescreen. NOTE: If you are using PowerPoint slides you have already created, you must save your PowerPoint as a .pptx file before you start recording!! Otherwise your audio will not be saved!! Go to save as and then choose PowerPoint Presentation (*.pptx).
Step 2 – Prepare script/equipment. Add your script to the notes pane in PowerPoint and ensure you have all the equipment needed to record. See below for more tips on preparing your PowerPoint.
Step 3 – Record your presentation using PowerPoint recorder. Watch this video on getting started with PowerPoint recorder or see the guide from the digital training team.
Pre-record lectures using PowerPoint
Step 4 – Publish to Stream/export as video. From PowerPoint it is very simple to publish as a video directly to Stream. To see this option, ensure you are logged into your Office 365 account. Or you can export your presentation as a video file and then upload it to the Media Library.
Step 5 – Edit/create captions. Depending on how you choose to publish your video, use the auto-caption feature within Microsoft Stream or create your captions file manually and upload the captions along with the video to the Media Library.
Step 6 – Make available on Moodle/Teams. Embed your narrated presentation onto your Moodle course. If you are embedding from Stream, ensure you give the permissions needed so your students are able to view the video.
Tips for preparing a Narrated Presentation using PowerPoint
Design
- Consider Dr Richard Mayers’ multi-media learning theory and principles when designing your PowerPoint. In Mayers’ redundancy principle he states that “People learn better from graphics and narration than from graphics, narration, and printed text.” (Mayer, 2009) You may want to avoid adding paragraphs of text on your slide and use graphics/animations to illustrate what you are saying instead.
Equipment
- Microphone. You may find that recording through a headset/headphones with mic will produce a better sound quality than inbuilt microphones as it can reduce background noise.
- PowerPoint. You can access this through your Office 365 account or download the app onto your device.
- Internet connection for publishing narrated presentations to Stream and embedding onto Moodle.
To script or not to script
If you use a script, you can add this to the notes pane in PowerPoint. This will help you when you record your narrated presentation. I have made numerous narrated presentations and I would recommend you prepare a script in advance of making the video. This can produce a higher quality video and I find it always takes less time to record when I have a script. Other lecturers have attested to this too. If this isn’t feasible, it would be beneficial to create an outline of the lecture and add this to the notes pane.
Accessibility
Where scripts for content are created, it is good practice to upload the transcript/PowerPoint with your video or simply upload a text document of the transcript to Moodle. These can be very useful for students, especially those with disabilities.
Practice
You may want to do a quick run through of all of the steps in the process to see if this works for you. You can start by recording your first slide and publishing to Stream before you record the whole lecture.
Join our top tips for recording content with PowerPoint workshop on Tuesday 14th July from 12:00-13:00 – See our upcoming events page to get the link to the Teams meeting.
If you have used PowerPoint for narrated presentations and are willing to share your experiences or any examples, please use the online learning and teaching support Teams space
References:
Mayer, R. (2009). Redundancy Principle. In Multimedia Learning (pp. 118-134). Cambridge: Cambridge University Press. doi:10.1017/CBO9780511811678.009
Further recommended reading:
Roberts, David. (2017). The Engagement Agenda, Multimedia Learning and the use of images in HE lecturing: Or, how to end Death by PowerPoint. Journal of Further and Higher Education. 10.1080/0309877X.2017.1332356.
Mayer, R. (2001). Multimedia Learning. Cambridge: Cambridge University Press. doi:10.1017/CBO9781139164603
2 responses on "5 Days of Video Creation: Narrated Presentation"
Leave a Message
You must be logged in to post a comment.
Thank you, this is very useful. Where can I find the Media Library?
Hi Catherine, our MEDIALibrary can be found here http://hml.yorksj.ac.uk/
You can find information and guides at https://tel.yorksj.ac.uk/medialibrary/, or just get in touch with the TEL team if you need any help, informaiton or advice!
Phil