
It’s day three of 5 days of Video Creation and today we are discussing screencasts.
YSJU provides a number of applications which enable academics to create multimedia content, quizzes and other online activities to help fulfill a range of teaching, learning and assessment objectives. First, it is important to understand how you would like to represent your content, then choose the most appropriate tool to help you create and present it.
Visit ‘Return to Campus: Learning & Teaching’ at https://wp.me/Pa0V3t-3jG for more information.
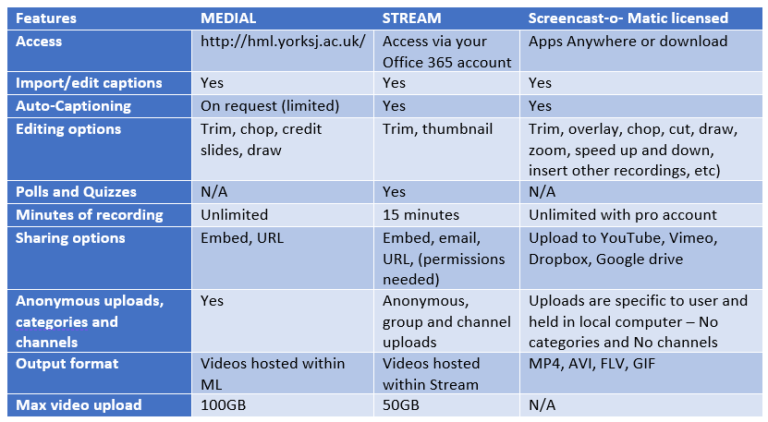
For the purpose of this post, I will be talking about using Screencast-o-Matic to create screencasts, but there are other tools available to YSJ staff such as Microsoft Stream and MEDIALecture. See my comparison table in the section Which tool is best for me? to help you decide which tool is best for you.
About Screencasts and Screencast-o-Matic
Screencasts are videos created by recording your computer screen and often include audio narration. Some tools also capture your webcam. The screencast can be published as a video to Microsoft Stream or the Media Library and then embedded onto Moodle.
Screencast-o-Matic is a screen capture tool, which can be accessed through Apps Anywhere or downloaded onto your device. To download Screencast-o-Matic, you will need a password. Contact the TEL team via the Staff IT Help portal: https://staff.help.yorksj.ac.uk/ or the digital training team for further details. There is a free version of this tool that gives you the basic features, but YSJU have purchased licences for Screencast-o-Matic Pro, giving you more features such as unlimited recording time, editing tools and draw and zoom while you are recording.
Common uses for screencasts include:
- Giving video introductions to your lectures or seminars
- Taking students on a tour of your Moodle site, showing where to find the activities and resources.
- Creating video summaries of your lectures key messages
- Giving instructional or software demonstrations on how to perform particular tasks
- Sharing evidence of good practice within your Faculty, or with the entire University
- Giving assessment feedback on formative and summative assessments
- Student presentations
- Mid-module evaluations
- Creating module/assessment information videos
Take a look at how Screencast-o-Matic has been used in teaching in this case study.
Advantages
- Students can stop, rewind and watch the screencasts over and over again and watch the videos anytime and anyplace.
- It can save time. For example, creating a screencast on how to navigate the Moodle course means you may receive fewer queries.
- The ability to provide step-by-step guidance on screen can be more effective than a simple guide with screenshots. Students learn in different ways and providing other multimedia such as screencasts can help students learn better.
Disadvantages
- You don’t see the faces of your students, which might cue whether or not they have understood the material
- No audience engagement
- More options for editing can make Screencast-O-Matic seem a bit overwhelming. However, you don’t need to use all the tools. Pick and choose the ones that are useful for you.
- You have to upload the video to either Stream or Media Library in order to share it with others.
Things to consider before you start your screencast
Screencast-o-Matic is fantastic for creating screencasts, but you might want to consider other tools such as Microsoft Stream and MEDIALecture. The screen recording feature in Microsoft Stream allows you to create up to 15 minutes and publishes directly onto Stream. MEDIALecture, which Phil discussed yesterday, has unlimited recording and publishes directly to the Media library. Uploading your video to these platforms will allow you to share a link or copy the embed code so you can embed your video onto Moodle. What these two tools don’t have is the extra functionality including the ability to edit throughout your recording and add transitions. I have created a comparison table below, which might help you decide which tool is best for you. Or see the document Which tool is best for me?
- Microphone. You may find that recording through a headset/headphones with mic will produce a better sound quality than inbuilt microphones as it can reduce background noise
- Screencast-o-Matic either launched from Apps Anywhere or downloaded via the YSJ Screencast-o-Matic webpages. (If you are a using a Mac, please note, you will not be able to access Apps Anywhere so you will need to download the tool onto your device. Please contact the TEL team of Digital training team for further details and the password.)
- Internet connection for downloading, publishing narrated presentations to Stream/Media library and embedding onto Moodle.
- Webcam (optional)
Process for developing a screencast using Screencast-o-matic
The process of creating and publishing screencasts is relatively simple.
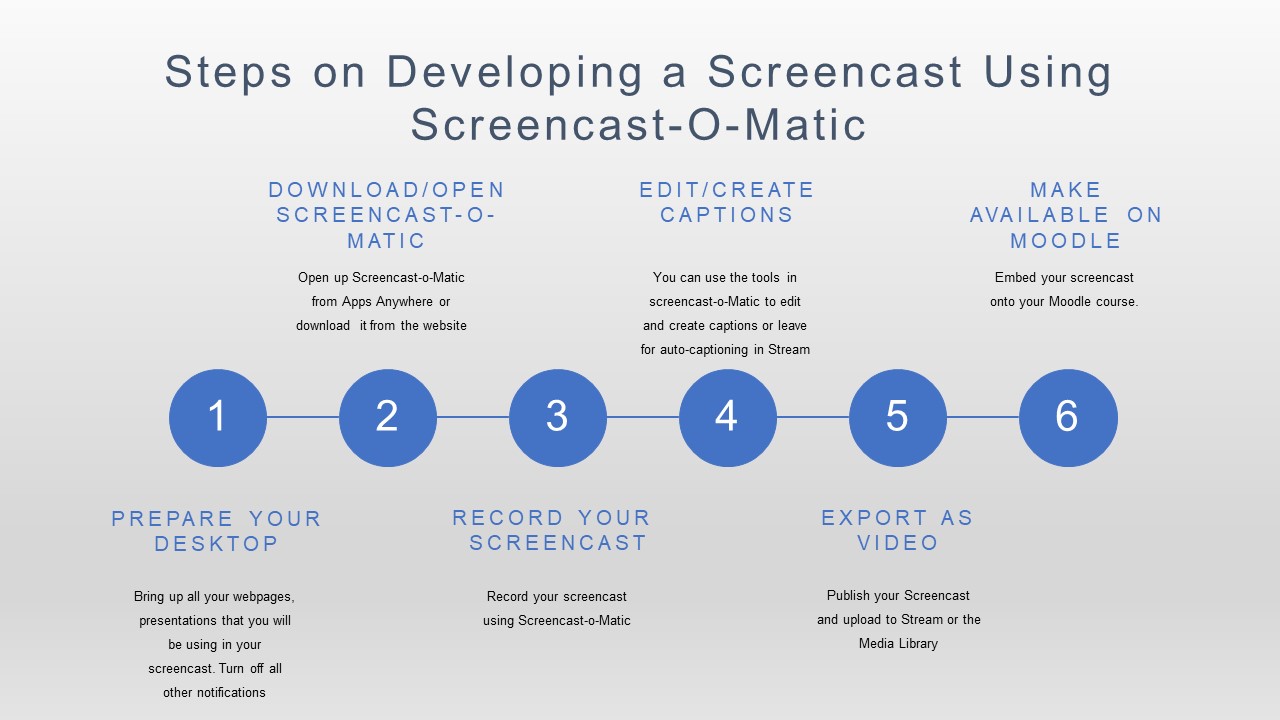
Step 1 – Prepare your desktop/device. Bring up all your webpages and presentations that you will use in your screencast. Turn off all other notifications.
Step 2 – Open up Screencast-o-Matic from Apps Anywhere or download it from the website.
Step 3 – Record your screencast. Watch this video on getting started with Screencast-o-Matic.
Step 4 – Edit/create captions. You can use the tools in Screencast-o-Matic to edit and create captions or leave for auto-captioning in Stream.
Step 5 – Export as video. Publish your screencast and upload to Stream or the Media Library.
Step 6 – Make available on Moodle/Teams. Embed your screencast onto your Moodle course. If you are embedding from Stream, ensure you give the permissions needed so your students can view the video.
TIPS FOR PREPARING and recording A SCREENCAST USING SCREENCAST-O-MATIC
Storyboard
When I create a screencast, I first put together a storyboard to plan out each scene. This means that if I get called away while developing the screencast, I know exactly where I am when I come back to it. This is the storyboard template I use. For each scene, you need to know what your voice-over will be and what your visuals will be. (Remember not to overload people with too much text on screen. Focus on what is important and what your overall objectives for the screencast are.) Finally, you might want to make note of any on screen direction or transitions that you want to put in during or after recording your screencast. This can be a time-consuming process, but it might help you when you start to record your screencast.
While you are recording
- Keep it conversational. Mayer’s personalisation principle states that “people learn better from multimedia presentations when words are in conversational style rather than formal style. “(Mayer, 2009)
- Ensure graphics appear at the same time as your audio. Mayer’s temporal contiguity principle states that “students learn better when corresponding words and pictures are presented simultaneously rather than successively.” (Mayer, 2009)
Accessibility
- Although Screencast-o-Matic does have captioning functionality, if you are uploading your published video to Stream, I would tend to use the auto-captioning feature that is built-in to Stream instead. I have found this less time consuming.
- Remember the auto-captions may need some tweaking afterwards. I have found exporting directly to Microsoft Stream and making those edits appears to be the most streamlined and efficient way of creating captions for most video types.
Practice
You may want to do a quick run through of all the steps in the process to see if this works for you. You can start by recording your first scene and publishing to Stream before you record the whole screencast.
Join our top tips for editing with Screencast-O-Matic workshop on Thursday 16th July from 12:00-13:00 – See our upcoming events page to get the link to the Teams meeting.
If you have used Screencast-o-Matic to create screencasts and are willing to share your experiences, examples, or any tips on using the tool or on screencasting more generally, please use the online learning and teaching support Teams space to post your comments.
References
Mayer, R. (2001). Multimedia Principle. In Multimedia Learning (pp. 63-80). Cambridge: Cambridge University Press. doi:10.1017/CBO9781139164603.005
Mayer, R. (2009). Personalization, Voice, and Image Principles. In Multimedia Learning (pp. 242-262). Cambridge: Cambridge University Press. doi:10.1017/CBO9780511811678.018
Mayer, R. (2009). Temporal Contiguity Principle. In Multimedia Learning (pp. 153-170). Cambridge: Cambridge University Press. doi:10.1017/CBO9780511811678.011
0 responses on "5 Days of Video Creation: Screencasts"